Localization
Sensibill SDK for iOS and Android comes with a several built-in languages:
- English (en) - DEFAULT
- English Canada (en-CA)
- French (fr)
- French Canada (fr-CA)
- Spanish (es)
- Spanish Spain (es-ES)
- Spanish United States (es-US)
SDK provides localization for all the languages in the above list.
By default the language is selected based on the logic of the standard localizedString function:
- If current locale matches one of the language-region combinations, the corresponding localization will be chosen
- If no region is matched, but current locale matches one of the languages, the corresponding language will be chosen.
- Finally, if no language is matched, the localization will default to English (en).
Integrator can alter the strings provided in the following ways:
- Override the strings for existing localizations.
- Provide localizations for additional languages.
- Or change the way the localizations are selected and provided to a custom method.
Preparing for Localization Customization
Prerequisite 1: Obtain the List of Customizable Strings
To obtain the SDK localization resources:
Expand one of the architecture slices (
ios-arm64orios-arm64_x86_64-simulator) inside theSensibill.xcframeworkIf you are usingSensibill.framework, expand theiOS/Sensibill.frameworkfolder.Locate the
en.lproj/Localizable.stringsfile, and open it in Xcode: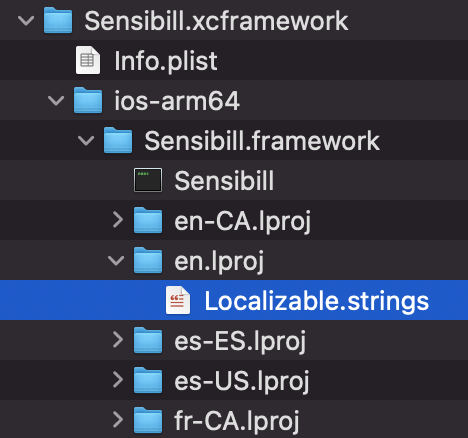
The file contains all the keys used by SDK. The comment above the key, and names of the strings provide a clue on how the key is used. For example
/* Image Preview Screen - Crop Button - Label */
"sblCapturePreviewScreenCrop" = "Crop";
specifies the label for Crop button with image on Preview Screen
Prerequisite 2: Specify localization bundle
You can store localization in any bundle convenient for your app. Prior to starting capture, pass the instance of the bundle where the localization resources can be found to SDK via the static Branding.Resources.localizationBundle property:
// Load the bundle with localizations
let bundle = Bundle(...)

// Pass the bundle to SDK
Branding.Resources.localizationBundle = bundle
Providing this property will alter the default SDK behavior in the following way:
- First, SDK will attempt to find a required localized string in the
Branding.Resources.localizationBundlespecified above. - If the value is not found in the specified bundle, the localized string provided with the SDK will be used, based on default logic explained at the top of this section.
Updating Localization for a Supported Language
Note: If the language you want to customize is not listed at the top of the page, please continue to Adding an Additional Language Support section below.
Steps:
- Follow Preparing for Localization Customization section.
- If you don’t have such file yet, add an
lprojand theLocalizable.stringsfor the language you want to customize into the bundle you specified inBranding.Resources.localizationBundleproperty in Prerequisite 2. if the file for the localization you want to modify already exists, you can proceed to step 3. - Copy the keys you would like to customize from the file you obtained in Prerequisite 1 to the new file you created above. You can copy all or only some keys (the missing keys will be localized using the default SDK strings).
Example:
Lets say you want to customize the Tips displayed in the capture. You want to store the customized strings in a main application bundle.
First, locate the keys you want to customize. The keys related to tips are listed in the Capture Tips Customization section.
Next, tell SDK which bundle it should check for localization strings:
Branding.Resources.localizationBundle = Bundle.mainLets say you want to localize tips for en localization, for which you already have en.lproj/Localizable.strings. So you can add the keys to the existing file:
"sblCaptureTipsScreenFlattenReceiptDescription" = "By providing a tip, you can help the user to capture a better receipt image";
"sblCaptureTipsScreenFlattenReceiptTitle" = "A receipt tip";
Now the first capture tip will display the text you specified, when in general en locale. Note that unless you also customize other en- locales, you may still see the default tip.
Supporting Additional Languages
If the language, or a language-region combination is not currently supported by SDK, you can add the localization for that language.
Steps:
- Follow Preparing for Localization Customization section to ensure both prerequisites are fulfilled.
- Add an
lprojand theLocalizable.stringsfor the language you want to customize into the bundle you specified inBranding.Resources.localizationBundleproperty in Prerequisite 2. - Copy all the keys from the list you obtained in Prerequisite 1 into the new file. Provide the values on the language you are adding. Note that if you omitted ay keys, they will use the default localization, based on the logic described at the top of this section.
Advanced Customization
Integrator can also change how localization is selected and applied by overwriting the default implementation of the BrandingL10NProvider, and providing it to the Branding instance prior to capture launch:
// Create a custom BrandingL10NProvider protocol implementation
class MyCustomLocalizationProvider: BrandingL10NProvider {

    // Implement protocol functions
    func localizedString(forKey key: Branding.L10NKey.Capture) -> String {
        // ...
    }
}

// Provide it to branding prior to Capture launch:
let branding = Branding()
branding.localization = MyCustomLocalizationProvider()

// Use this instance of branding to build Capture.RuntimeSettings
// Note that in this case "receipt" was selected as document type
let runtimeSettings = Capture.RuntimeSettings.receipt(branding: branding, featureFlags: ...)

// Present Capture
let capture = CaptureNavigationController(settings: runtimeSettings)
// ...
The Sensibill SDK uses String resources to set text content used in native UI. To customize Strings in the SDK:
- Add the desired string resource to the host application’s
strings.xmlfile (typicallystrings.xmlin thevaluesfolder) - Make sure the added string resource has the same name as the string resource that is to be overridden in the SDK. We can provide specific string key values upon request.
<resources>
    ...
    <!--Sensibill String value to be overridden-->
    <string name="sb__sensibill_string_resource_to_override">My Customized string value</string>
</resources>
Note: For localization, make sure to add the string resource to the string resources file in the correct localized values folder. (ie, values-es/string.xml for Spanish translations)